Improving the Performance of Serial Ports Using C#
Doug Richards, Dotric Pty Ltd, September 2010.Contents
IntroductionHardware Considerations
Time Reader Project
Message Definitions
Remote Time Reader Mark 1
Local Time Reader Mark 1
First Test Results
Remote Time Reader Mark 2
Second Test Results
Local Time Reader Mark 2
Third Test Results
Conclusion
Introduction
The process of developing the Station Blue product uncovered a number of performance issues with the .NET serial port interface. The Station Blue product software runs on desktop and mobile devices using either hardwired serial ports or Bluetooth. The port speed in all cases is 9600 baud which can be assumed to be fast enough to control model trains, especially considering that the newer digital model railway systems are effectively limited to a data speed of less than 9000 baud. However, while the average data flow rate might be described as light, bursts of large amounts of data can occur. Under these circumstances it was found that the Microchip PIC based device at the remote end could actually outrun the C#.NET software at the PC end.This article describes a number of simple test programs designed to demonstrate performance issues with the .NET serial port interface and what might be done to improve things. In most practical cases the serial port is used to facilitate control of a device by a PC. However, to avoid unnecessary complexity the test setups devised in this article use a PC at both ends of the serial link.
Hardware Considerations
These days many new computers do not have a physical serial port. However if you are so included, there is usually a connection point for a serial port on the motherboard itself. So if you have a bent for lifting the lid off your computer you probably also have a cupboard full of old computer parts, some of which could be fairly easily used to install a physical serial port. Failing this USB to serial converter cables are available from electronics shops.In any case, serial port communication is intended primarily to facilitate the control of a device. In the project presented here two computers are connected together via their serial ports. To make each computer appear like a device to the other it is necessary to either, use a null modem cable between the two computers, or to connect a null modem device into the cables connecting the two computers.
Alternatively, a serial port connection can be established using Bluetooth. For those computers that do not already have Bluetooth, Bluetooth dongles can be purchased for about the same money as a USB to serial converter cable. However, if you think that Bluetooth gets you out of the computer/device null modem cabling problem, think again. A typical My Bluetooth Places window contains icons representing Bluetooth devices providing services. So your device (or simulated device) must appear in that window for the PC to connect to. Thus if your device is in fact another computer, you must go to the Bluetooth services window on that computer to determine which virtual serial port or ports are available to provide the required service.
Time Reader Project
Click to copy TimeReader source filesThe typical scenario I am attempting to represent in this article is of a data collecting device connected to a PC that is providing a user friendly interface. That user friendly interface has been developed in C#. It interprets and displays the collected data and may be required to send controlling data to the device, based on a number of inputs.
As indicated earlier, for the purposes of this exercise the data collecting device is in fact another PC. The data being collected is simply the time of day. On the PC providing the interface, the user may select the number and frequency of data samples required. The collected data samples are displayed in a list view along with the time that the request for data was actually sent and the time that the data was finally received. To add to the complexity of the data collection task, the user may require the same samples to be collected in a number of different process threads.
In this project the data collecting device is referred to as "RemoteTimeReader" and the user friendly interface is referred to as "LocalTimeReader". Mark 1 versions in each case follow a fairly conventional development path with less than perfect results. Mark 2 versions provide significant improvements.
Message Definitions
The message definitions for the TimeReader project are described in the following table.| Message | Code | Data |
| Acknowledge Request | 0x01 | |
| Acknowledge | 0x02 | |
| Acknowledge Received | 0x03 | |
| Time Request | 0x04 | index, time 1 |
| Time | 0x05 | index , time 1, time 2 |
Once the device (RemoteTimeReader) has started, it periodically sends out Acknowledgement Request messages. Once the PC interface (LocalTimeReader) has started, it responds to Acknowledge Request messages with an Acknowledge message. The device responds to an Acknowledge message with an Acknowledge Received message. During extended idle periods both the device and the interface will test the line by sending Acknowledge Request and Acknowledge messages respectively.
Significantly the Acknowledge Request, Acknowledge and Acknowledge Received messages are all one byte long to avoid synchronization issues. In fact when the device first starts up it will only accept Acknowledge messages. In larger systems, devices may drop back to only sending Acknowledge Request messages and only receiving Acknowledge messages, if a communication error is detected.
The Time Request message received by the device contains an index to the process thread within the PC interface that sent the message, and the time that the message was sent.
The Time message sent back to the PC inteface contains the index and time information sent to the device along with the time actually recorded by the device at the remote end.
So to some code. Message class is used to both collect data for a message and define that message for subsequent processes. It is used by both RemoteTimeReader and LocalTimeReader. The Message class constructor is shown below.
- public Message(byte first)
{ - code = first;
status = MessageStatus.InProgress;
- if (code == 0x01 || code == 0x02 || code == 0x03)
- status = MessageStatus.Complete;
- else
- dataCount = 0;
- }
The first byte for the message is passed in the constructor. The first byte is the only byte for code 0x01, code 0x02 and code 0x03 messages and thus the message status changes to "Complete" within the constructor for these messages. For messages longer than one byte, the Add method is called until the message status changes to "Complete". The Add method is shown below.
- public void Add(byte next)
{ - if (code != 0x04 && code != 0x05)
- return;
- if (dataCount == 0)
{ - index = next;
dataCount = 1;
return; - }
- timeBytes[dataCount-1] = next;
dataCount++;
- if (dataCount == 9 && code == 0x04)
{ - timeBytes[dataCount-1] = next;
- status = MessageStatus.Complete;
localTime = (long)BitConverter.ToInt64(timeBytes, 0); - }
if (dataCount == 17 && code == 0x05)
{
- status = MessageStatus.Complete;
localTime = (long)BitConverter.ToInt64(timeBytes, 0);
remoteTime = (long)BitConverter.ToInt64(timeBytes, 8); - }
- }
Times are sent and received as ticks which are 8 bytes long. Thus the data component of code 0x04 messages is 9 bytes long including the index byte. With two time values and an index byte the data component of code 0x05 messages is 17 bytes long. Once the message is assembled, downstream processes obtain the collected values using the accessors Code, Index, LocalTime and RemoteTime.
Remote Time Reader Mark 1
As previously explained, the purpose of the RemoteTimeReader program is to simulate a remote device collecting time values. As such its design takes a path of minimalism. It is a console application that, once the C#.NET SerialPort class has been initialized and set up, runs within a while loop within the Main method. This while loop continues to execute for as long as the "Clear To Send" CTS line is up. The CTS line is a convenient way of checking the physical integrity of the communication link.The first few lines of the while loop is shown below.
- while (port.CtsHolding)
{ - int totalBytes = port.BytesToRead;
- if (totalBytes == 0)
{ - if (totalBytes == 0)
- Thread.Sleep(10);
if (sleepCount == 100)
{ - if (!acknowledgementTimerElapsed())
- return;
- sleepCount = 0;
- }
- sleepCount++;
continue; - sleepCount++;
- Thread.Sleep(10);
- }
- int totalBytes = port.BytesToRead;
- static private bool acknowledgementTimerElapsed()
{ - if (status == PortStatus.ConnectionEstablished)
- status = PortStatus.ConnectionIdle;
- else if (status == PortStatus.ConnectionIdle || status == PortStatus.NotConnected)
{ - if (status == PortStatus.ConnectionIdle)
- status = PortStatus.CheckConnected;
- byte[] dataBytes = new byte[1];
dataBytes[0] = 0x01;
port.Write(dataBytes, 0, dataBytes.Length);
- }
- else if (status == PortStatus.CheckConnected)
{ - Console.WriteLine("Communication lost - Timeout on acknowledge request");
return false;
- }
return true;- }
When a message is received, the status is changed to ConnectionEstablished by the ReceivedMessage method described later. When the acknowledgementTimerElapsed method is called and the status is ConnectionEstablished it with change the status to ConnectionIdle. Thus when acknowledgementTimerElapsed is called again and the status is still ConnectionIdle, this indicates that no messages have been received for a second. If this is the case then the status will be changed to CheckConnected and a Acknowledge Request message will be sent.
If the acknowledgementTimerElapsed method is called and the status is CheckConnected then no messages have been received for a second even though a Acknowledge Request message has been sent. If this is the case then the method returns false effectively closing the application.
Referring back to the while (port.CtsHolding) loop within the main method, if there is data to be read from the port, then this data is assembled into a message using the Message class desribed earlier. Once a message is assembled then the ReceivedMessage method shown below is called.
- static private void ReceivedMessage(Message receivedMessage)
{ - if (receivedMessage.Code == 0x02)
{ - status = PortStatus.ConnectionEstablished;
byte[] dataBytes = new byte[1];
dataBytes[0] = 0x03;
port.Write(dataBytes, 0, dataBytes.Length);
- }
if (status == PortStatus.NotConnected)
- return;
- if (receivedMessage.Code == 0x04)
{ - byte[] dataBytes = new byte[18];
dataBytes[0] = 0x05;
dataBytes[1] = receivedMessage.Index;
(BitConverter.GetBytes(receivedMessage.LocalTime)).CopyTo(dataBytes, 2);
(BitConverter.GetBytes(DateTime.Now.Ticks)).CopyTo(dataBytes, 10);
port.Write(dataBytes, 0, dataBytes.Length);
- }
- if (receivedMessage.Code == 0x02)
- }
Local Time Reader Mark 1
The LocalTimeReader program is intended to be PC based user interface that displays the data provided by the remote device. The serial port code at this end is therefore structured rather differently to the RemoteTimeReader program. The ConnectedSerialPort class inherits the .NET SerialPort class and provides the SerialPort class with all the necessary set up parameters. The LocalTimeReaderPort class inherits the ConnectedSerialPort class and deals with the application specifics.At this end there is no infinite loop, instead the ConnectedSerialPort class sets up events to deal with CTS pin changes and data received. In addition, a one second timer is set up in the LocalTimeReaderPort class constructor to call the acknowledgementTimerElapsed method which is much the same as the acknowledgementTimerElapsed method in the RemoteTimeReader program.
A data received event causes the ProcessDataReceived method within the LocalTimeReaderPort class to be called. The ProcessDataReceived method is shown below.
- protected override void ProcessDataReceived(object sender, EventArgs e)
{ - int totalBytes = this.BytesToRead;
if (totalBytes == 0) - return;
- int byteCount = 0;
while (byteCount < totalBytes)
{ - if (newMessage)
{ - if (status != PortStatus.NotConnected)
- status = PortStatus.ConnectionEstablished;
- receivedMessage = new Message((byte)this.ReadByte());
if (receivedMessage.Status == Message.MessageStatus.InProgress) - newMessage = false;
- else
- ReceivedMessage(receivedMessage);
- }
else
{ - receivedMessage.Add((byte)this.ReadByte());
if (receivedMessage.Status != Message.MessageStatus.InProgress)
{ - newMessage = true;
ReceivedMessage(receivedMessage); - }
- receivedMessage.Add((byte)this.ReadByte());
- }
byteCount++;
- if (newMessage)
- }
- int totalBytes = this.BytesToRead;
- }
- private void ReceivedMessage(Message receivedMessage)
{ - if (receivedMessage.Code == 0x03)
- status = PortStatus.ConnectionEstablished;
- if (receivedMessage.Code == 0x01)
- parent.ReceivedAcknowledgeRequest();
- if (status == PortStatus.NotConnected)
- return;
- if (receivedMessage.Code == 0x05)
- parent.ReceivedTime(receivedMessage.Index, receivedMessage.LocalTime, receivedMessage.RemoteTime);
- }
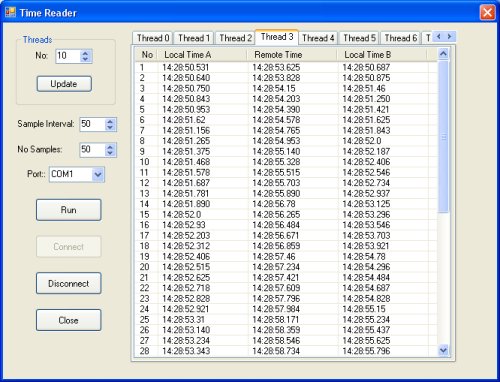
The LocalTimeReader inteface is shown below.
![]()
The user interface also facilitates adjustment of the sample interval and the number of samples. Connect is pressed once the RemoteTimeReader has been started at the remote end. Run is pressed to commence data collection.
The code that actually deals with each tab page display is contained in ThreadPage class. ThreadPage class of course inherits the .NET TabPage class. When Run is pressed on the main form the Run method shown below is called for each tab page.
- public void Run(LocalTimeReaderPort port, int interval, int noTicks)
{ - localTimeReaderPort = port;
tickTotal = noTicks;
intervalTimer.Interval = interval;
listView.Items.Clear();
tickCount = 0;
localTimeReaderPort.SendTimeRequest(index, DateTime.Now.Ticks);- if (tickTotal > 1)
- intervalTimer.Enabled = true;
- }
The event handler for the interval timer is shown below.
- void intervalTimer_Tick(object sender, EventArgs e)
{ - if (localTimeReaderPort != null)
- localTimeReaderPort.SendTimeRequest(index, DateTime.Now.Ticks);
- if (tickCount == tickTotal)
{ - intervalTimer.Enabled = false;
parent.RunStop(); - }
tickCount++;
- }
When a Time message is received the ReceivedTime method shown below is called.
- public void ReceivedTime(long localTime, long remoteTime)
{ - ListViewItem item = listView.Items.Add((listView.Items.Count+1).ToString());
if (localTime < DateTime.MinValue.Ticks || localTime > DateTime.MaxValue.Ticks)
- item.SubItems.Add("Invalid Time");
- else
- item.SubItems.Add(GetTimeString(new DateTime(localTime)));
- if (remoteTime < DateTime.MinValue.Ticks || remoteTime > DateTime.MaxValue.Ticks )
- item.SubItems.Add("Invalid Time");
- else
- item.SubItems.Add(GetTimeString(new DateTime(remoteTime)));
- item.SubItems.Add(GetTimeString(DateTime.Now));
- ListViewItem item = listView.Items.Add((listView.Items.Count+1).ToString());
Now to the MainForm class. The event handler for the Update button calls the RefreshTabPages method that is shown below.
- public void RefreshTabPages()
{ - tabControl.Controls.Clear();
- for (byte iii=0; iii < (byte)updateNumericUpDown.Value; iii++)
- tabControl.Controls.Add(new ThreadPage(iii, this));
- }
The event handler for the Connect button is shown below.
- private void connectButton_Click(object sender, EventArgs e)
{ - if (localTimeReaderPort != null)
- localTimeReaderPort.ClosePort();
- localTimeReaderPort = new LocalTimeReaderPort(this);
if (localTimeReaderPort.OpenPort(portComboBox.SelectedItem.ToString()))
{ - connectButton.Enabled = false;
disconnectButton.Enabled = true;
- }
else - MessageBox.Show("Port " + portComboBox.SelectedItem.ToString() + " failed to open");
- }
When a Acknowledge Request message is received the ReceivedAcknowledgeRequest method shown below is called.
- public void ReceivedAcknowledgeRequest()
{ - if (this.InvokeRequired)
- BeginInvoke((MethodInvoker)(delegate { ReceivedAcknowledgeRequest(); }));
- else
{ - runButton.Enabled = true;
localTimeReaderPort.SendAcknowledge(); - }
- }
When Run is pressed the Run method for each instance of ThreadPage class is called.
When a Time message is received the ReceivedTime method shown below is called.
- public void ReceivedTime(byte index, long localTime, long remoteTime)
{ - if (this.InvokeRequired)
- BeginInvoke((MethodInvoker)(delegate { ReceivedTime(index, localTime, remoteTime); }));
- else
{ - ((ThreadPage)tabControl.Controls[index]).ReceivedTime(localTime, remoteTime);
- }
- }
First Test Results
To set up a test, start by running the RemoteTimeReader program on the remote computer. If the serial port to be used is COM1 then no input parameters are required. I prefer to run console applications like RemoteTimeReader in a Command Prompt window to make it easier to read error messages from unexpected program terminations.Once the RemoteTimeReader program is running start the LocalTimeReader program on the local computer and press Connect. If all is well then the Run button should be enabled within a few seconds. As a further check, press Run with the defaults of one sample and one thread and observe that a test result appears in the list view.
Once everything looks good crack things up a bit. Set the number of threads to 10, the number of samples to 50 and the sample interval to 50. Press Run again. A result similar to that shown below should result.
- The interval between the Local Time A values is around 110 ms which is more the double the 50 ms interval actually selected.
- The interval between the Remote Time values is around 188 ms. With 10 threads running, 10 Time Request messages each 10 bytes long are being sent per sample interval, the data flow through the serial port is less than half the available speed of 9600 baud.
- The interval between the Local Time B values is around 170 to 220 ms.
- The round trip interval between Local Time A and Local Time B starts out at a reasonably quick 156 ms, but because the sample interval is quicker than the Remote Time interval the last round trip ends up taking around 5 seconds.
However one thing is certain, if a real data collection device was running at the remote end of our 9600 baud line then the LocalTimeReader program would have to cope with data arriving at more than twice the speed we are seeing here.
Remote Time Reader Mark 2
To speed the remote end up the RemoteTimeReader program has been rewritten in the C programming language. I call it C rather than C++ because no classes are actually defined. The Win 32 API requires a sequence of commands like CreateFile, GetCommState, SetCommState, GetCommTimeouts and SetCommTimeouts. This command sequence is described in the Code Project article Non Overlapped Serial Port Communication using Win32 by EshwarThe only signficant points of difference between Eshwar's code and my code to be noted are firstly, the SetCommMask and WaitCommEvent commands are not used. Secondly, the read timeouts have been set to a rather low one second. As with the C# version, there is a main while loop. In the C case it is as shown below.
- while(true)
{ - char buffer[1000];
DWORD readSize;
if (ReadFile(hSerialPort, buffer, 1000, &readSize, NULL) != 0)
{
- .
.
.
.
- }
if (!AcknowledgementTimerElapsed(hSerialPort)) - break;
- char buffer[1000];
- }
If data is received then the code within the curly brackets after the ReadFile command is executed. Once again the business of parsing and acting on the data received is much the same as the C# version.
Second Test Results
To test the new code run the RemoteTimeReaderC program on the remote computer. Once the RemoteTimeReaderC program is running start the LocalTimeReader program on the local computer and press Connect.Once again, when everything looks good crack things up a bit. Set the number of threads to 10, the number of samples to 50, the sample interval to 50 and press Run. A result similar to that shown below should result.
- As before, the interval between the Local Time A values is around 110 ms which is more the double the 50 ms interval actually selected.
- As before, the interval between the Remote Time values is around 188 ms.
- The first four Local Time B values are all the same and then the interval between these values seems to settle at around 188 ms.
- Because the first four Local Time B values are all the same, the round trip interval between Local Time A and Local Time B starts out looking quite slow. However, because the interval between Local Time B values is more consistently 188 ms than before, the last round trip time remains much the same.
From practical experience I know that the bundling of messages so that maybe four arrive "at the same time" is a real pain, because information from one of the earlier messages in the bundle may be required to modify the behaviour of the device.
Local Time Reader Mark 2
Since it appears that the data flow between the two machines is still less than 9600 baud, the next thing to do is totally disconnect the GUI processes from the serial port processes. This will of course do nothing to speed up the GUI, but it will stop the bundling of messages that is presumably occuring during GUI related processes.To facilitate the disconnect the variables shown below are added to LocalTimeReaderPort class.
- private Queue queue1 = new Queue();
private Queue sendMessageQueue;
private Thread sendMessageThread;
private ManualResetEvent sendEvent = new ManualResetEvent(false);
private Queue queue2 = new Queue();
private Queue receiveMessageQueue;
private Thread receiveMessageThread;
private ManualResetEvent receivedEvent = new ManualResetEvent(false);
- sendMessageThread = new Thread(this.SendMessageThread);
sendMessageQueue = Queue.Synchronized(queue1);
sendMessageThread.Start();
receiveMessageThread = new Thread(this.ReceiveMessageThread);
receiveMessageQueue = Queue.Synchronized(queue2);
receiveMessageThread.Start();
- private void SendMessageThread()
{ - while (true)
{ - while (sendMessageQueue.Count > 0)
{ - SendMessage((byte[])sendMessageQueue.Dequeue());
- }
- sendEvent.WaitOne();
sendEvent.Reset();- while (sendMessageQueue.Count > 0)
- }
- while (true)
- }
- private void StartSendMessage(byte[] data)
{ - sendMessageQueue.Enqueue(data);
sendEvent.Set(); - }
The ReceiveMessageThread method used by receiveMessageThread is shown below.
- private void ReceiveMessageThread()
{ - while (true)
{ - while (receiveMessageQueue.Count > 0)
{ - ReceivedMessage((Message)receiveMessageQueue.Dequeue());
- }
- receivedEvent.WaitOne();
receivedEvent.Reset();- while (receiveMessageQueue.Count > 0)
- }
- while (true)
- }
- private void ReceiveMessageThread()
{ - while (true)
{ - while (receiveMessageQueue.Count > 0)
{ - ReceivedMessage((Message)receiveMessageQueue.Dequeue());
- }
- receivedEvent.WaitOne();
receivedEvent.Reset();- while (receiveMessageQueue.Count > 0)
- }
- while (true)
- }
Third Test Results
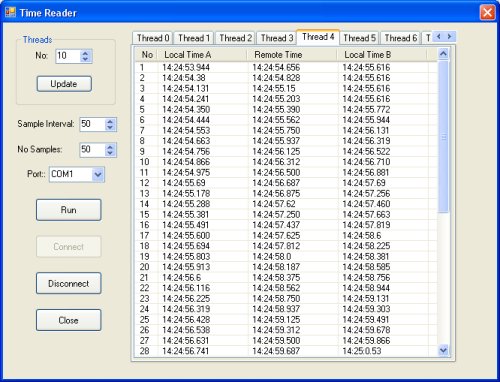
To test the new code run the RemoteTimeReaderC program on the remote computer. Once the RemoteTimeReaderC program is running start the LocalTimeReaderGT program on the local computer and press Connect.Once again, when everything looks good crack things up a bit. Set the number of threads to 10, the number of samples to 50, the sample interval to 50 and press Run. A result similar to that shown below should result.

- The interval between the Local Time A values is now down to 60 ms which is reasonably close to the 50 ms interval actually selected.
- The interval between the Remote Time values is still around 188 ms.
- The interval between the first two Local Time B values is rather high and then the interval between these values seems to settle at around 188 ms.
- The first round trip interval between Local Time A and Local Time B starts out looking quite slow at 828 ms. The last round trip value is certainly slow at around 8 seconds. However, the sample rate is now nearly twice what it was, so the 8 seconds round trip time might be regarded as good in proportion.
Conclusion
I understand that a DataReceived event is raised by the .NET SerialPort class whenever a complete byte is available for reading. Each event starts a new process thread. However, when all of the available process threads are running each new byte of received data is buffered until a process thread becomes available. This explains the bundling of messages seen in the second series of tests.So it seems that some process in version 1 of LocalTimeReader was slow to release the process threads required by the DataReceived event. The only solution then was to minimize the time taken by the DataReceived event handler by reducing its task to simply adding the data to a queue.
To enable the GUI to run smoothly, it seems that is necessary to have a queue for outbound data as well.